The winner from my Tool Talk blog hop for 2 half yards of beautiful Island Batik is Wordygirl. Her fabrics will be sent out soon.
Congratulations Wordygirl!
The winner from my Tool Talk blog hop for 2 half yards of beautiful Island Batik is Wordygirl. Her fabrics will be sent out soon.
Congratulations Wordygirl!

I hope you've been enjoying this Tool Talk Blog Hop. This is week 4 and the final week of the Hop. Be sure and check out the list of posts for this week below and enter the weekly Island Batik fabric bundle drawings. If you missed any posts from the first three weeks, go back to my last couple of blog posts to see the listings.
September 26

Pamela Boatright, Pamela Quilts
September 27

Anorina Morris, Samelia’s Mum
Brianna Roberts, Sew Cute and Quirky
September 28
End of Blog Hop + Final Round Up
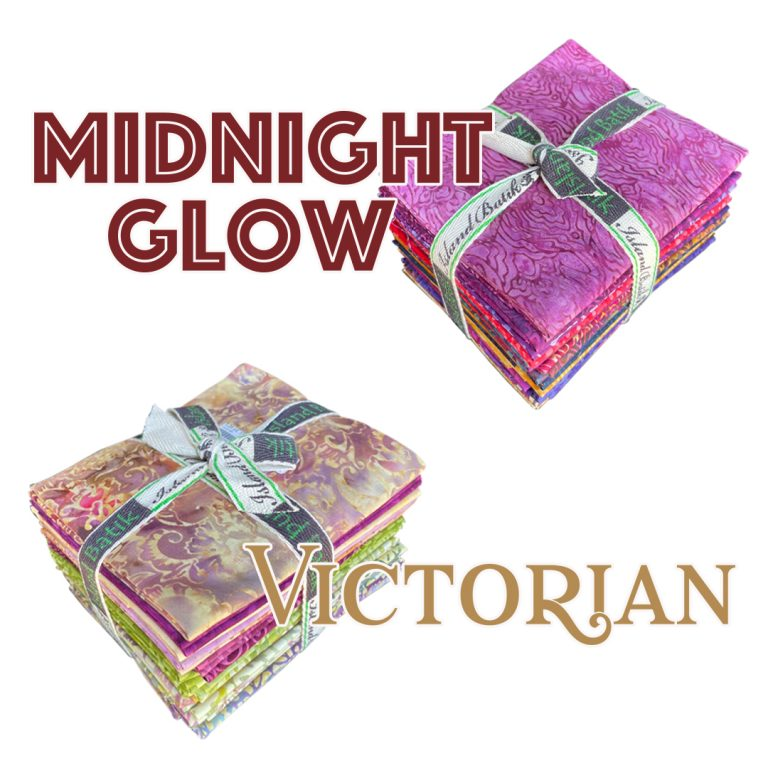
Island Batik Drawing for this final week is for bundles of Midnight Glow and Victorian. Go to the Island Batik Blog to sign up for the drawing.

September 19

Elizabeth DeCroos, Epida Studio
Jane Hauprich, Stitch by Stitch Custom Quilting
September 20

Emily Leachman, The Darling Dogwood
Andi Stanfield, True Blue Quilts
September 21

Leah Malasky, Quilted Delights
Claudia Porter, Create with Claudia
September 22

Mania Hatziioannidi, Mania for Quilts
Reed Johnson, Blue Bear Quilts
September 23
Blog Hop Week 3 Round Up + giveaway. Island Batik has a giveaway of a bundle of Paisley Got Mod by Kate Colleran Designs and Silverado Canyon by Kathy Engle. Go to Island Batik to enter the drawing.

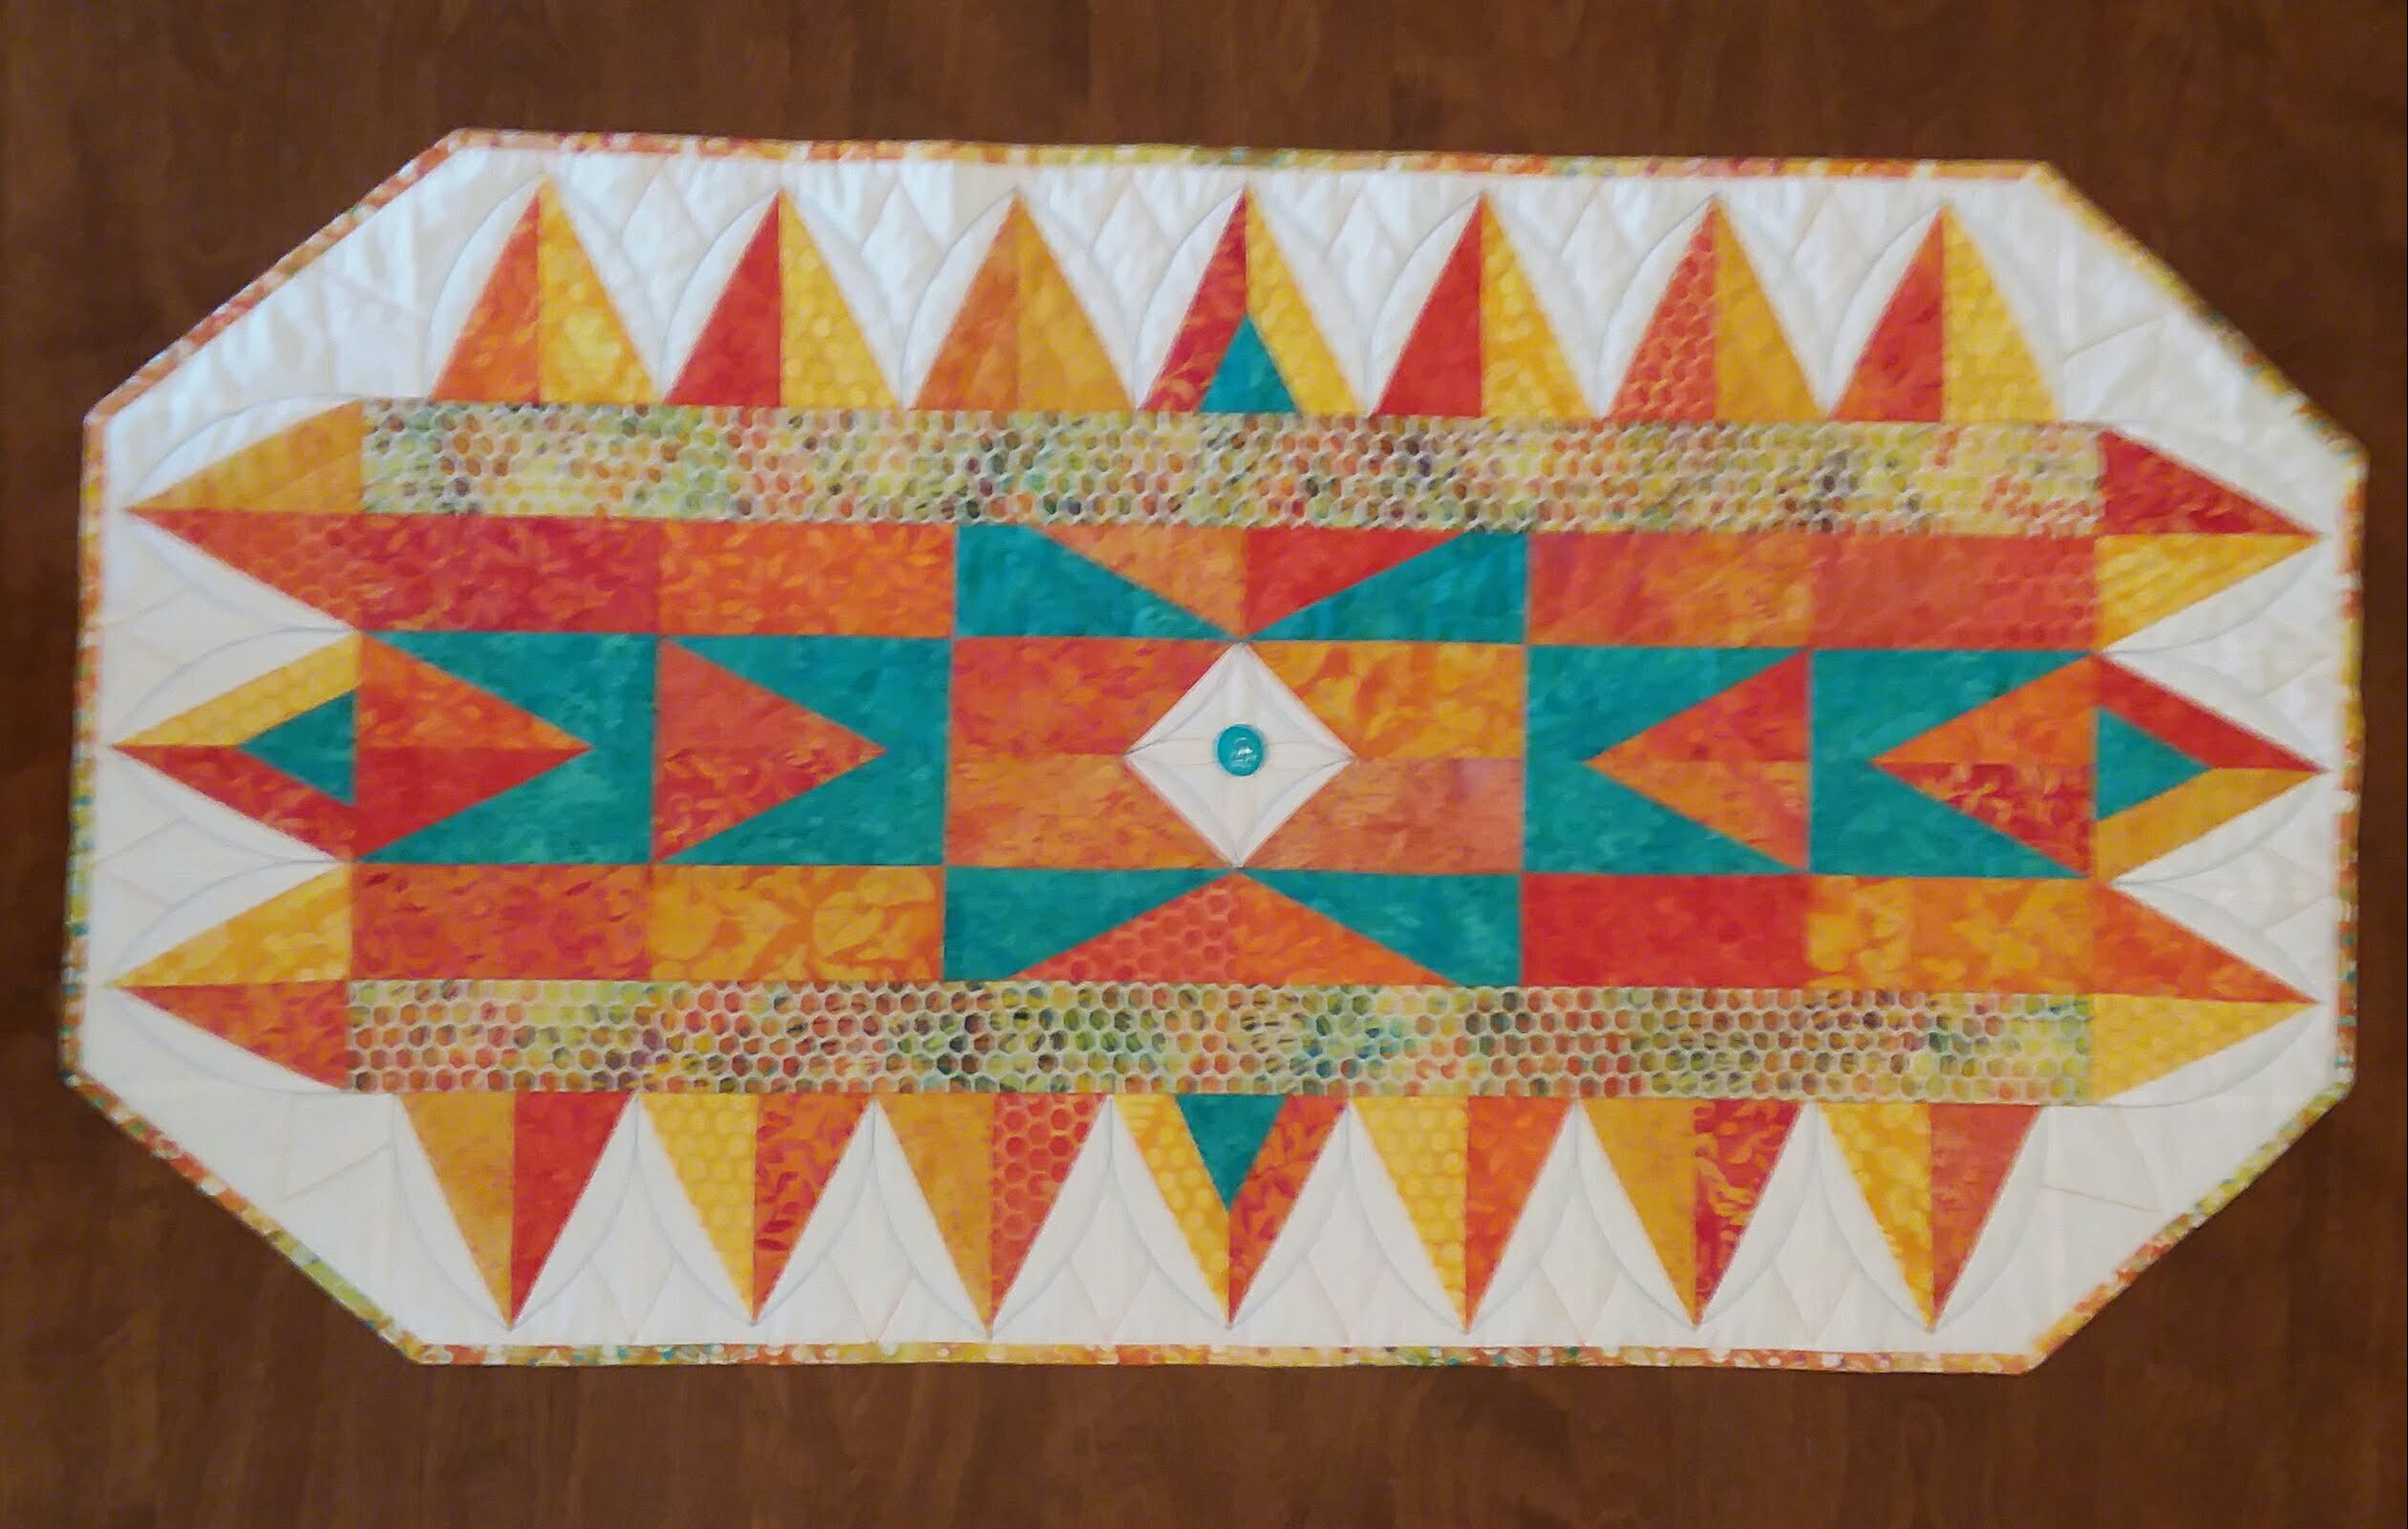
The September Island Batik Ambassador challenge was to use the ruler we received from Deb Tucker's Studio 180 and the bundle of new Spring 2022 fabrics from Island Batik that we received in our July boxes.

The ruler I received was the Corner Pop II. This ruler is used for making cut corners with a 2:1 ratio. What I really like about Deb Tucker Rulers is that each ruler makes so many different sizes. This ruler makes 12 different sizes. It also has left and right handed instructions. There are also very helpful online instructional videos.

The Spring Island Batik Bundle I received is called Honeycomb designed by Kathy Engle for Jackie Kunkel Canton Village Quilt Works. It's a lovely range of colors from orange and yellow to pink. Island Batik also sent two coordinating fabrics that could be used with the bundle.


Now I was more excited and I worked on a pattern. I decided to add Island Batik white solid and a teal fabric from the Island Batik Foundations that picked up some of the color in a couple of the fabrics. I like how the teal brings out the other colors and adds a "pop" to the quilt. One of my favorite fabrics in the collection is the one on the top left. Notice how it incorporates the teal color.
For the outside border I cut white rectangles 5 1/2" x 2 1/2". Using the Corner Pop II ruler I cut off a corner of half of the blocks. Then you can reverse the ruler and cut the reverse corner off the rest of the blocks.

Then I cut the orange and yellow triangles to fill out the blocks. The instructions on the ruler are very clear on how to cut the corners and triangles. One nice thing about using batiks is that you can use the triangles on either side as the coloring is the same on the front and the back.

I used the ruler on most of the blocks for the center of the table runner also. Notice how in the center of each of the borders I actually used the ruler twice- once for the yellow/orange fabrics and once again for the small teal fabric.
I forgot to get a photo of pressing the blocks on the new pressing mat from Prairie Spirit Alpacas. It is really great to press your blocks on! We were supposed to make at least 30 of the new ruler blocks in the project. I ended up making 52.
I used Hobbs Natural Cotton Batting and Aurifil 40 wt thread in orange 1133 and teal 1320.


Today starts week 2 of the Tool Talk Blog Hop. See the list below for the new Island Batik Collections and Ambassadors that are posting their projects using the fabrics and Deb Tucker's Studio 180 Design rulers.
*Special note - Weds is my day to post. Both Preeti Harris and I will be showing what we made with the beautiful Island Batik Honeycomb Collection. We each received different Deb Tucker ruler's to use, so be sure and check us out to see what we made!
September 12

Lisa Pickering, Lisa’s Quilting Passion
Suzy Webster, Websterquilt
September 13

Denise Looney, For the Love of Geese
Gail Sheppard, Quilting Gail
September 14

Preeti Harris, Sew Preeti Quilts
Connie Kauffman, Kauffman Designs
September 15

Megan Best, Bestquilter
Maryellen McAuliffe, Mary Mack Made Mine
September 16
Blog Hop Round-Up Week 2 and Giveaway. Be sure and enter this week's Island Batik giveaway for a bundle of Honeycomb or Cheers!

September is time for a new Island Batik Ambassador Blog Hop. The theme of this Hop is called Tool Talk.

This hop is joined with Deb Tucker's Studio 180 Design and showcases many of her specialty rulers. Her rulers are designed to make many different sized units.
The Hop starts today and runs thru Sept. 28. Each week several Ambassadors will show what they made using the most recent Island Batik fabrics and one of Deb Tucker's rulers. Each week Island Batik has a wonderful drawing- so be sure and enter! Below is the prize for this week - a bundle of Bee Kind and Baroque- two beautiful collections! Go to the Island Batik blog to enter.

WEEK 1
September 6

Gail Renna, Quilt Haven Threads
Michelle Roberts, Creative Blonde Gifts
September 7

Sandra Starley, Textile Time Travels
Jennifer Thomas, Curlicue Creations
September 8

Brenda Alburl, Songbird Designs
Jennifer Fulton, Inquiring Quilter
September 9
Blog Hop Round-Up Week 1 and Giveaway
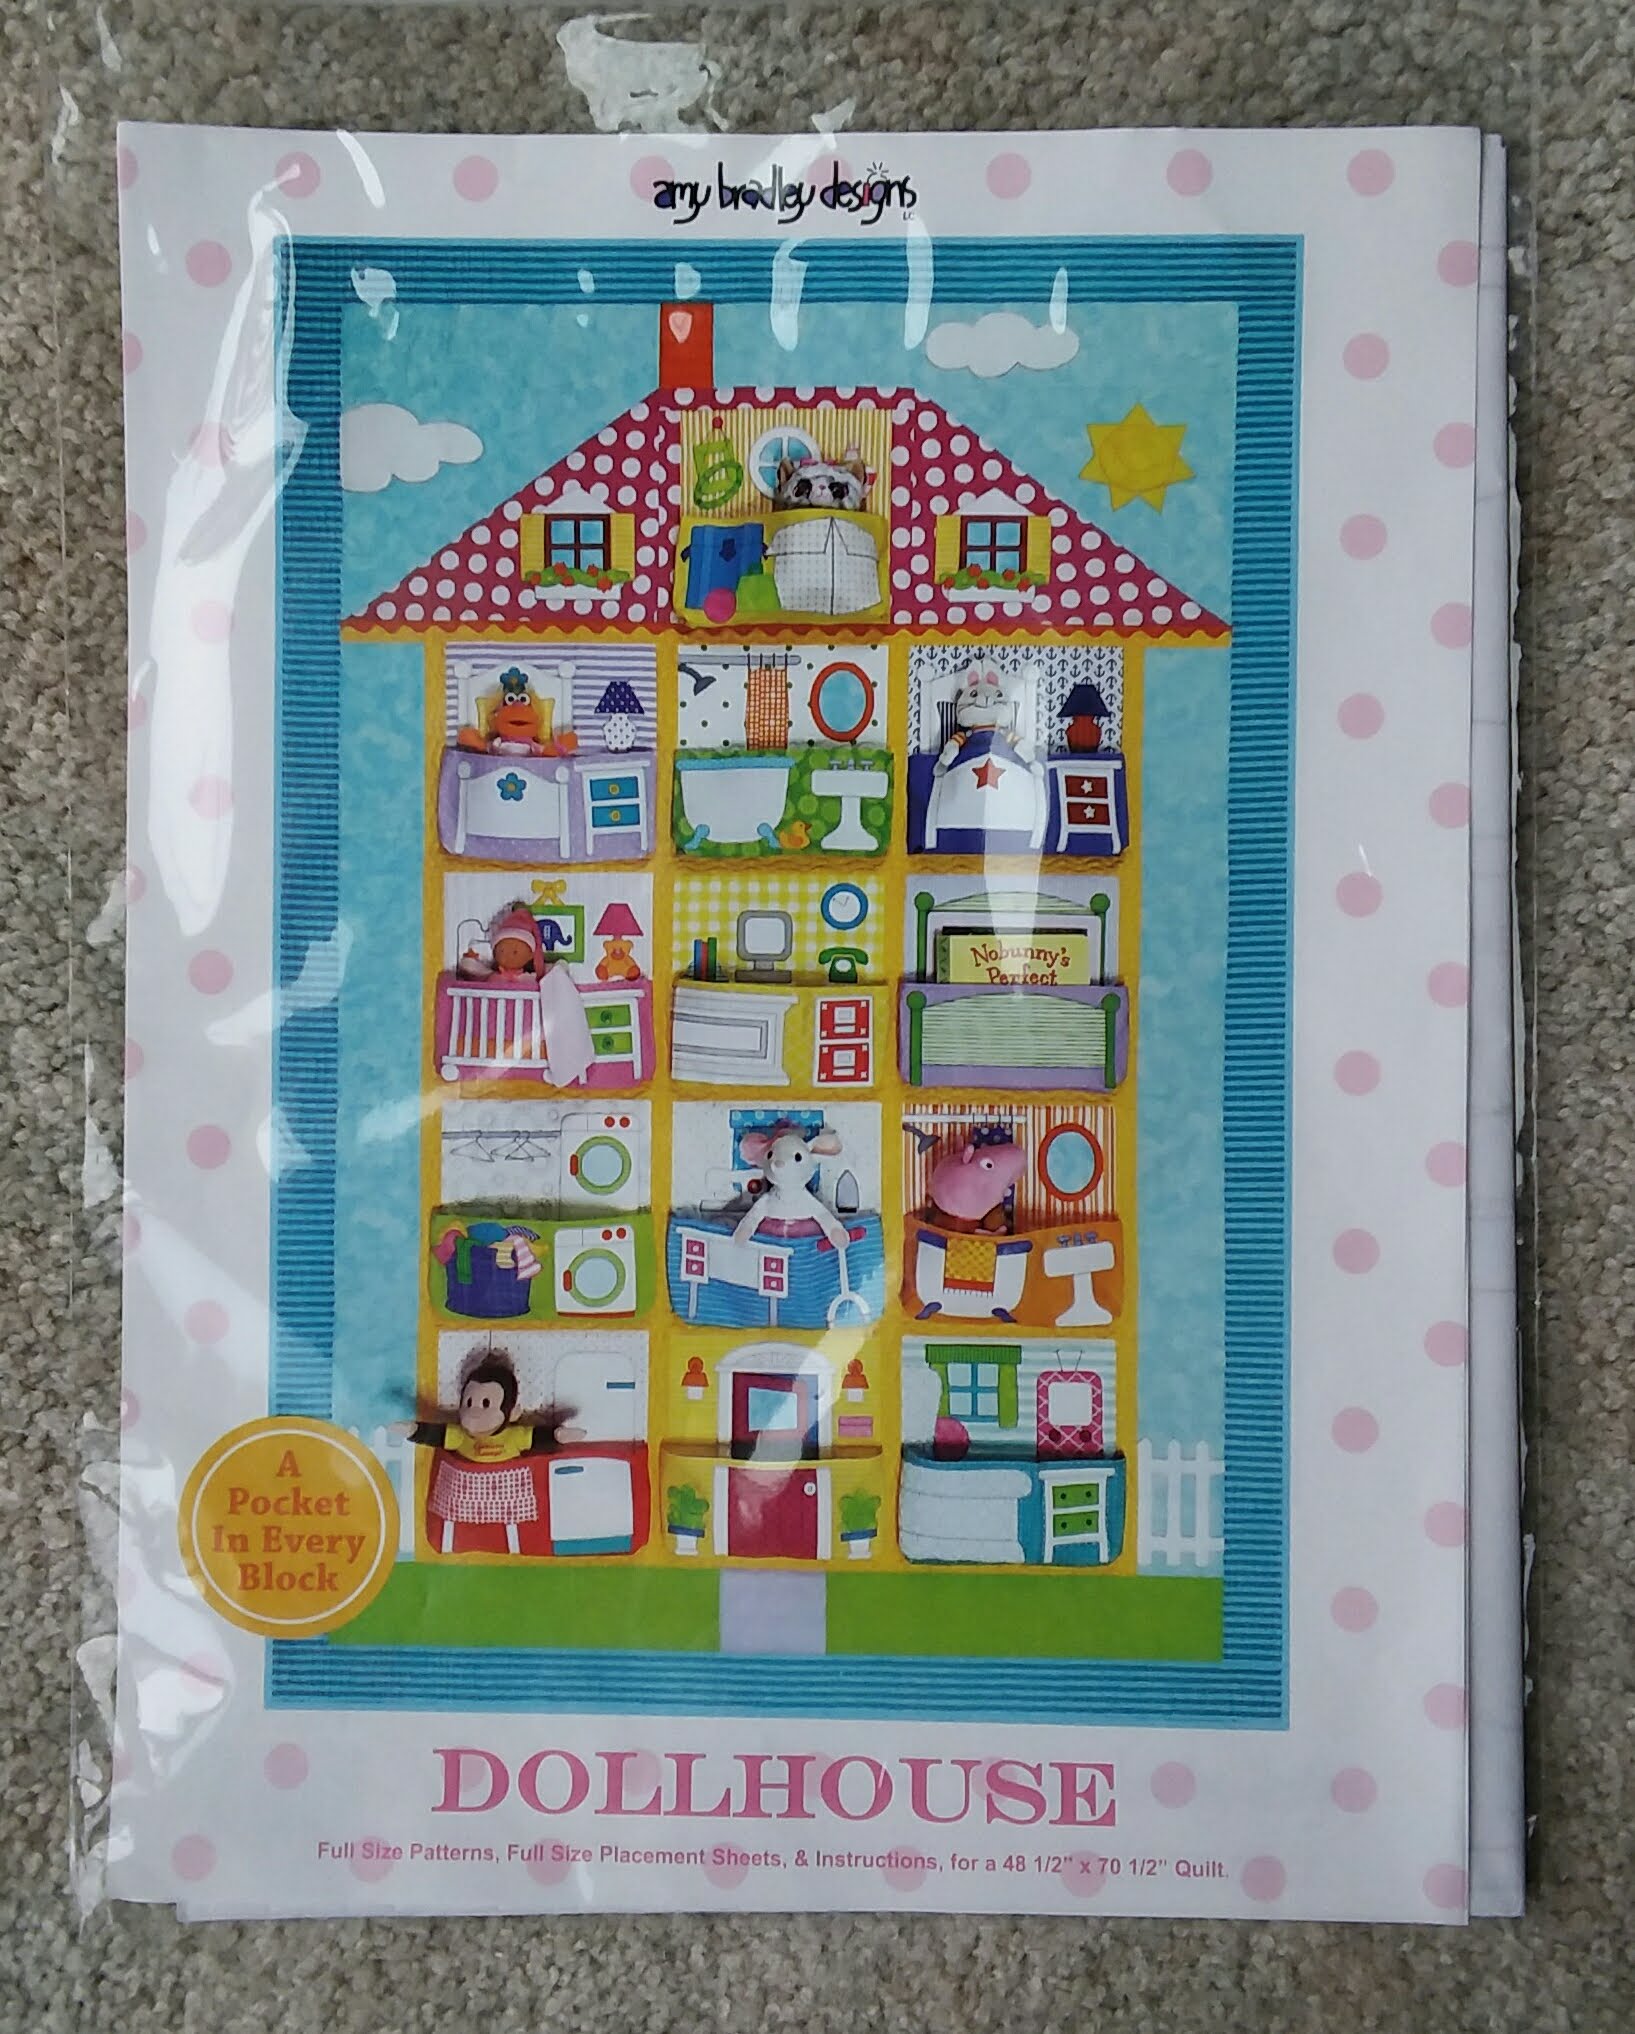
It's September and the start of the Doll House block of the month. If you saw my post last month you know that this year we will be making the Dollhouse quilt by Amy Bradley Designs. Anyone that is interested can purchase the pattern from Amy Bradley Designs and join in the fun. The pattern comes as a paper pattern or the digital download pattern is now available. I won't be giving out any patterns or instructions, so you need to purchase your own pattern - you'll be very happy when you do! Her patterns and instructions are fantastic.
The paper pattern costs $29.00. The download pattern costs $12, but be aware you will be printing out about 100 pages of patterns and instructions. There are a limited amount of paper patterns available, so be sure and order soon if you want it.
This month I will be going over the pattern and giving you an outline of the schedule so if you haven't gotten your pattern yet you still have time. The first block we will be making starts in Oct. although you can start at any time along the way.
So- the Dollhouse pattern has everything you need - full size patterns, full size placement sheets and instructions for a doll house with 13 rooms (48 1/2" x 70 1/2") or a doll house with 10 rooms (48 1/2" x 59 1/2"). It may seem like a lot of paper, but it is all very easy to understand and work with.
The first thing Amy suggests is to read thru the instructions. This doesn't take long and is very helpful. There are also some instructions printed on the pattern sheets.
The next thing I think you need to do is decide if you want to make a 10 room house or a 13 room house. You can always change your mind later, but it's good to have an idea of what you want to make at the start. I personally decided to make the 10 room house, but anyone making the 13 room house can follow along at the same pace.
The patterns are terrific. There is a pink sheet that has a materials list for both the 13 room and the 10 room house. This is very detailed and really helpful. I'm glad she made it pink so it's easy to see and pull out when you need it.
One thing on the list is how much Wonder Under Fusible you will need for each house. I think it's good to get this as soon as you get the pattern so you are ready to go!
Here is the schedule of what block we'll be doing each month for the next year:
Oct - Front Door Nov - Kitchen Dec - Living Room Jan - Sewing Room Feb - Nursery March - Bathroom (s) April - Girls Bedroom (other Bedrooms) May - Laundry Room June - Office July - Attic August - Borders and appliques Sept - Assembling blocks, quilting and finishing the Quilt.
I'm not giving any instructions, but will give a helpful hint once in awhile. I have 3 for you today!
Hint number 1: Once you look over the patterns and instructions, lay the pattern sheets out and cut them apart. For the most part they are one room per half sheet. This makes them more manageable and once you finish a room you can put the paper aside. As Amy states in the directions- you can iron these sheets to make them flat.
Hint number 2: Once you have your pattern and you are ready to get started, you might want to start tracing your pattern pieces onto the Wonder Under. This gives you a little head start and something to do until we start work on the first block.
I have to admit that I started tracing my patterns during a 2 1/2 day power outage when I couldn't do any other sewing! I put the patterns for each room in a plastic bag that was labeled and then I clipped all the bags together. I have a basket where all the patterns and instructions fit nicely and I can just pick it up and move it to where ever I'm working.

Hint number 3: If you are like me, you've looked at the cute pattern and can't wait to get started. You might want to spend some time pulling fabrics you might like to use as backgrounds and foregrounds for the rooms. Amy's designs are bright and whimsical and each room has different colors.
One of my goals in making this quilt is to only use fabrics that I have, so that can be an interesting challenge!
Well, this is a very wordy blog post. I hope I haven't bored you. This is just a short overview of what I will be presenting each month. I hope many of you will join in the fun. Please post comments and photos as we progress along.
*For those of you who have never seen other patterns by Amy Bradley, you can check out her fun patterns at her website here: Amy Bradley Designs