Monday, November 7, 2022

Island Batik Creative Christmas Stockings

 It's November and many people start thinking of decorating for Christmas.  The Island Batik Ambassadors had the challenge this month to make a Creative Christmas Stocking, so we are getting in the holiday spirit.


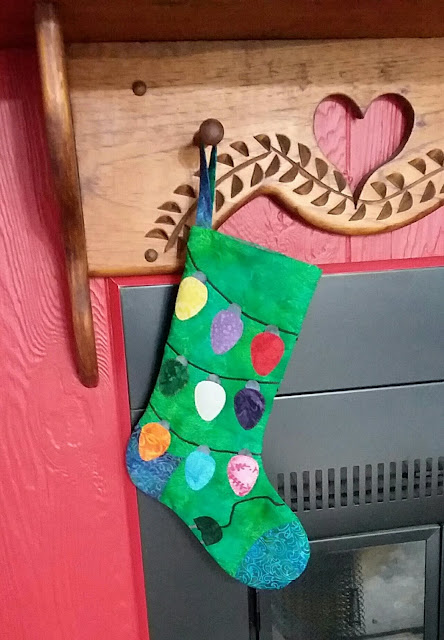
I thought  long and hard about what kind of stocking to make.  I wanted to make something with a lot of different fabrics from the last shipment of fabrics.  Since most of my fabrics were not what I'd normally think of as Christmas colors it was a challenge to decide what to make.  After MANY designs, I finally decided on the stocking wrapped with colorful Christmas lights.  I ended up using 13 different fabrics, so that met my personal goal.

You can find many patterns and directions on Pinterest, so I picked a general stocking pattern and went to work.  First thing to do was to cut two outside fabrics and two lining fabrics from the Island Batik Baroque Collection and two pieces of batting.  I used Hobbs Thermore Batting as it is very thin and would work well for this project. The lining fabrics are almost to pretty to hide inside!

I added heel and toe fusible appliques to the front and back of the stocking.  With batik fabric the front and back are reversible - you just need to make sure you have them facing the correct way.

I made 9 light bulbs for the front and 9 for the back and one plug. I wasn't sure which way this stocking would hang, so I wanted both sides to be decorated.  The Prairie Spirit Alpaca pressing mat works great for pressing/fusing the appliques. 


First I had to couch some yarn for the cord, then I fused the bulbs.  I like to use things I have on hand and I found some dark brown macramé cord to use.  It was a surprise when it started to melt from the heat of the iron!  I had to be very careful when pressing the bulbs!  Lesson learned!

Buttonhole stitching around the bulbs took 12 different Aurifil threads!  Lucky for me I have a nice collection of Aurifil from the Ambassador program!  Schmetz Super Nonstick Needles work great with sewing appliques.  They are the needles I always use for fusible applique.


After trimming the pieces, the next step was to sew the front and back to the lining pieces (making sure the toes are turning the correct way).  Press the seam open, then lay the rights sides together and sew around leaving an opening to turn along the lining edge.  Turn inside out, press and sew the opening closed.  Then tuck the lining inside.


Here is the stocking both front and back.


It's all ready to hang for Christmas at our fireplace.  Does this get you in the mood for some Christmas sewing?


Many thanks to Island Batik, Hobbs Batting, Schmetz Needles, Aurifil Thread and Prairie Spirit Alpacas for supplying products for this project thru the Island Batik Ambassador program.

You can check out the other Island Batik Ambassadors stockings at the websites below:

Brenda Alburl ~ Songbird Designs Megan Best ~ Bestquilter Pamela Boatright ~ Pamelaquilts Elizabeth DeCroos ~ Epida Studio Jennifer Fulton ~ Inquiring Quilter

Preeti Harris ~ Sew Preeti Quilts Mania Hatziioannidi ~ Mania for quilts Jane Hauprich ~ Stitch By Stitch Custom Quilting Reed Johnson ~ Blue Bear Quilts Connie Kauffman ~ Kauffman Designs . Emily Leachman ~ The Darling Dogwood Denise Looney ~ For The Love Of Geese Leah Malasky ~ Quilted Delights Maryellen McAuliffe ~ Mary Mack Made Mine Anorina Morris – sameliasmum.com Lisa Pickering ~ Lisa’s Quilting Passion Claudia Porter ~ Create with Claudia Gail Renna ~ Quilt Haven Threads Brianna Roberts ~ Sew Cute And Quirky Michelle Roberts ~ Creative Blonde Gail Sheppard ~ Quilting Gail Andi Stanfield ~ True Blue Quilts Sandra Starley ~ Textile Time Travels Jennifer Thomas ~ Curlicue Creations Suzy Webster ~ Websterquilt


Tuesday, November 1, 2022

November Doll House Block

 It's time for the November Doll House block from Amy Bradley Designs Doll House pattern.  This month it is the Kitchen.

Each block gets easier to make.  This one only has one line you need to draw on the background (the light cord) to mark and sew separately.

Here is how I audition fabrics and pin pieces to my foam core board  that I covered with batting.  I can stick the pieces to the board with pins to see how they look.  If I don't like any of the colors, I can make a new piece.  I wasn't sure about the bright pink planter color, but decided to stick with it.

I found it helpful to layer some of my applique pieces on top of an applique pressing sheet with the pattern behind it.  

You can layer the pieces and press them.


After the pieces cool, you can remove the whole piece from the sheet.  Then you can put the whole piece on the fabric background over the diagram sheet and press.  This way there are less pieces to layer all at once.


Here are my front and back pieces.  I haven't done the buttonhole stitching yet.  There will be buttons on the plant, but they need to be attached after the quilt is quilted.


Here I'm sewing the pocket to the background and making the corners.


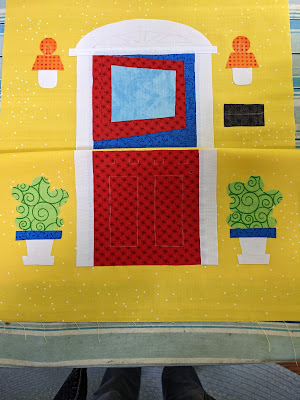
I went ahead and sewed the kitchen to the front door block since I'd decided to place them side by side like in the pattern.  You can position the rooms any way you like.


If you look closely you can see how much whiter the refrigerator is than the white door frames.  I backed the white fabrics like it suggests in the pattern and it does keep the background colors from showing thru as much and they look whiter.

Remember you can purchase a pattern (paper or digital) from Amy Bradley Designs at any time and join in the fun!

Feel free to post photos of your blocks in the comments as you get them done.  Here is my sister Jody's front door pieces.  It looks great!


Next month will be the Living Room block.  .

Feel free to post photos of your rooms in the comments below- I'd love to see them!