Pages

Friday, December 17, 2021

New Christmas Tree Skirt


In going through some old quilting things I came upon a small (I thought) pattern that I'd never made.  In fact I don't even remember where I got the pattern.  Maybe someone gave it to me or I got it in a swap or something?  I thought it would be an interesting mini to make while I was all caught up with deadlines.
The pattern is called Scrap Happy Diamonds by Cindy Edgerton - and it is NOT a mini!


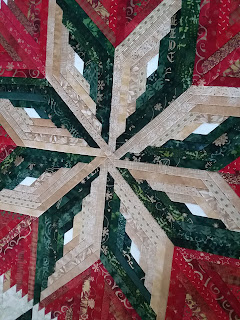
The pattern itself comes in a package 4" x 5 1/2"  which is why I mistakenly thought it was a small quilt.  If you do READ the package it says it makes a quilt 58" x 58".  Above is a photo of the package and a paper foundation for one block.  Those tissue paper patterns folded up really tight and small!

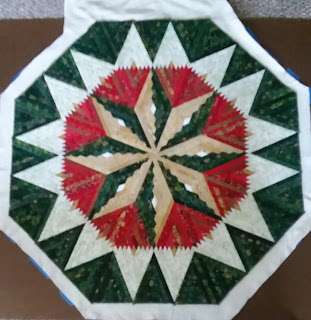
Okay, I was up for a challenge, but didn't want to make that big of a wall quilt or color it the way it was on the pattern.  I decided it would make a great tree skirt if you trimmed it down and eliminated some blocks.

I set off and pulled reds and greens (mostly Island Batik Christmas prints) and mixed whites- many of which had gold and/or Christmas prints.


It was interesting to work with such big blocks as I usually work much smaller.


Having pieced the whole thing together I decided to go ahead and quilt it before making it into a tree skirt.


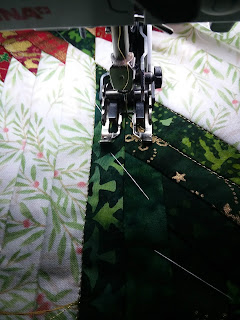
I quilted it with a gold thread in the ditch.


Kind of a shame to cut the center out and a slit thru one side - especially when it laid nice and flat!

Here is a photo of  my old tree skirt and the new one.  I think I've improved my skills and also my scrap stash!


It is now in it's place under the tree and waiting for the family to gather for Christmas.

I hope you all have a wonderful Christmas holiday!


Friday, December 3, 2021

December English Paper Piecing Challenge


Floating Hexies
31 1/2" x 15 1/4"
Designed and made by Connie Kauffman

English paper piecing is the December challenge for the Island Batik Ambassadors.  This is the last challenge for the year, and it was an interesting one.

Traditional English paper piecing was usually done with hexagons.  There are many other shapes that are now used for EPP (English paper piecing).   You can find many tutorials online on how to prepare the shape you've chosen to use.  Essentially what you do is prepare a heavy paper in the shape you want to work with - for example a hexagon.  Then you cut a piece of fabric about 1/4" bigger all around than the paper.  You fold over and stitch the fabric to the paper - or stitch the corners together and press.  Then you take two of the shapes and hand stitch them together along one edge.  It makes a great take-along project.  It's also a wonderful way to make use of small scraps.

I've done English paper piecing with hexies in the past.  The first quilt show I ever went to (many years ago) had a class on Miniature English Paper Piecing that my sister took. Little did she  know just how small the pieces would be!  The individual pieces were only 1/2"!  


I like miniatures, but that was extreme! She showed me how to make them and I did make some hexie flowers, but never completed a project.  Cute, but oh so small!  I have to admit that I glued the edges with a glue stick and over the years never removed the papers as I never finished a project with them.  Sad to say, the little gems are very stiff and hard now and it's about impossible to stitch them together. 

I made a quilt by fussy cutting the hexies called Granddaughter's Flower Garden that was featured  in the book Quilting to Go.  The hexagons in the quilt were all fussy cut with cute fabrics.


photos courtesy of House of White Birches/Annies

I've also done some large hexagons where the hexies are pieced.  I learned this from the book Pieced Hexies  by Mickey Depre.

Her book is great and these pieced hexie blocks can be turned in various ways to create different looking designs.  They are fun to make.

Here is a photo of a pieced hexagon block 8" x 8" with one of my mini hexagon flower blocks 1 1/2" x 1 1/2" inside it.  I don't think I'll be making anymore of those mini's !


Everything I've done in the past was interesting, but I wanted to do something different for this Island Batik Challenge.  I thought about a lot of designs. 


I wasn't crazy about doing a lot of hand sewing this time and I'd seen some modern quilts with hexies spaced apart, so that is the technique I decided to work on.  This may be stretching the concept of English Paper Piecing, but it is using hexies and preparing hexies in the traditional way.

This quilt was going to be modern and I wanted to add a couple other challenges for myself.  I had purchased a Sewline Fabric Glue Pen at a past quilt show and had never used it.  I decided instead of tacking down all the edges of my hexies with needle and thread I would glue them down!  Wow was that fast!  And not messy at all!

I found a pattern for hexagons online.  This one is 1 1/2" and I just printed them out and cut out all the shapes I needed.  


I read that it is also helpful to have a hole in the paper so that it is easier to remove the paper once the edges have been folded in and secured, and pressed.  I just used a hole punch.  The holes weren't in the center, but it did make removing the papers very easy.  First I ran a pin under the glued edges.  The fabric separated  from the paper very easily, then I put the pin in the hole and popped the paper out.  I didn't even have to press them again.  After I'd glued all the hexies, I removed all the  papers.


After deciding how I wanted to lay out the hexagons I decided to chalk mark the lines on my quilt top.
First I layered my favorite batting- Hobbs Heirloom 80-20 Fusible  with the quilt top and backing and ironed them together.  This made a very secure piece to work with and easy to do the chalk marking.

I first placed a hexie in the very center and marked lines thru each point.  Then the rest of the lines were 1/2" apart.  You can see on my little sample on the lower left how each hexie is 1/2" apart and a line will be quilted between each one and thru each point.  The marking made the  placement of the hexies very easy.


To further make this an easy project,  I glued all the hexies down with the Sewline Fabric Glue Pen.  I only put glue on the corners.  This held them very securely while I did the straight line sewing with my walking foot.  I did really like this glue pen.  The glue held well and didn't make the fabric stiff and didn't gum up the needles.  My only regret with the pen is that you can't see how much glue you have left.  I did end up using the whole stick of glue in the pen with this project.  The package come with a refill, but I would have been really sad if I had run out in the middle of the project.

I used a variety of Island Batik fabrics for this project.  I used a dark purple foundations fabric for the backing and mostly fabrics from the Sunkist Soleil collection designed by Kathy Engle for Jackie Kunkle as well as the green from the Flutter Fly collection by designer Kathy Engle and Leaf Vine-Nasturtium from the Blenders collections.

I used a lovely variegated thread for the quilting that picked up all the colors in the fabrics.


Floating Hexies was an interesting project.  I tried a couple new techniques and a new product.  And of course using Island Batik fabrics will makes a project shine!  It's always good to expand your quilting experiences!


*The winner from my Nov blog hop is Kathleen.  Her fabrics are on the way!

Many thanks to Island Batik and Hobbs Batting for providing products to use in this project thru the Island Batik Ambassador program.


Monday, November 15, 2021

Mardi Gras Trail in Quiltmaker

 My quilt Mardi Gras Trail is in the Jan/Feb 2022 issue of Quiltmaker magazine


Mardi Gras Trail
Designed and made by Connie Kauffman
60" x 60"

The fabrics are from the Farm Fresh Collection by Kathy Engle for Island Batik.  The dark purple fabric is from the Island Batik foundations and really sets off the Farm Fresh colors.


The magazine will be on newsstands 11/30 but digital copies are available now at: https://www.quiltingdaily.com/product/quiltmaker-january-february-2022-digital-edition/

Or the pattern at: https://www.quiltingdaily.com/product/mardi-gras-trail-pattern-download/


Tuesday, November 9, 2021

Storm at Sea Blog Hop

                                                                            Storm at Sea                                                                              44" x 52 1/2"


The challenge this month for the Island Batik Ambassadors was to make a quilt using the Storm at Sea block pattern.  This is a great block with all straight line sewing, but can give the illusion of curves.


Each Ambassador was given a bundle of a new Summer collection.  This bundle came wrapped in our last Ambassador box because we couldn't show the fabrics yet, but they will soon be in your shops so you can start looking for them now!

The collection I received is called Passion Petals.  It was designed by Kathy Engels for Carol Moellers of Carol Moellers Designs.


I looked at a LOT of different Storm at Sea quilt patterns.  There are so many lovely designs and it can change dramatically by choosing different fabrics and where you put the colors in the blocks.

I ended up using 13 of the 20 fabrics in the collection in my quilt.  I also used the coordinating deep purple foundation fabric that was included with the bundle (see the dark color on top).  That fabric is so dark it is almost black, so I also added solid black for the smaller squares, binding and backing.


The Storm at Sea block is made with two different square in a square blocks that are easy to make, and a rectangle diamond block.  

I have made these blocks in the past and always seem to have a hard time getting them true to shape.  I have even made them with paper piecing, but that is also a bit challenging.  Having already tried out two of Deb Tucker's Studio 180 rulers, I looked into her Diamond Rects Ruler.  She has a great video on using the ruler, so I went ahead and purchased it since I knew I'd be making a bunch of those blocks.


Again, one of my favorite things about her rulers is that you can make them in a variety of sizes.  This one makes blocks 1" x 2", 2" x 4", 3" x 6" 4" x 8" and 5" x 10".  It also comes with great paper instructions.  The ruler can even be used by right and left handed persons with instructions.
*Helpful hint - I tape the paper instructions to the ruler when I'm done using it, so they are right there when I use the ruler again.

These blocks were easy to make, especially as I used the same color for all the  outside triangles.

I decided to use black fabric for the backing and to try Hobbs black batting for the first time.


I have to say I'm sold on this batting when your project has dark fabrics.  The batting is nice and soft and has no bearding- no little white fibers that poke thru with the quilting.  It was pretty amazing!

I used several Westalee Rulers to help with the quilting designs.


And Aurifil Thread for the quilting


Schmetz microtex needles are always in my machine.

I actually got the quilt finished before winter and took the photo in my side garden.  The petunia's just matched the Passion Petals fabrics.  Sadly they are gone now til next year.


I have a drawing for 3 half yard fabrics from the Passion Petals Collection.  These are lovely fabrics, so  be sure to enter!

Leave a comment to enter and make sure I can contact you if you are a winner.  USA entries only due to postage.
*If you are on my subscriber list and receiving this post via email, you may not see the comment area until you click on View in Browser.

Also be sure to also go to the Island Batik blog and enter this weeks contest.

Thanks to Island Batik, Hobbs Batting, Aurifil, Schmetz Needles for providing products for this project thru the Island Batik Ambassador program


Monday, November 1, 2021

November Storm at Sea Challenge and Blog Hop

                                  Welcome to Island Batik Ambassador Storm at Sea Blog Hop!

The challenge this month was to make a quilt  with the Storm at Sea block.  This block vividly depicts the rolling waves of a stormy sea. It is a slightly complex pattern that results in a wavy, secondary pattern in a quilt, even though there is no curved piecing. “Storm at sea” is a biblical block, one of several used by early quilters in America.

The Island Batik Ambassadors will be making quilts with fabric from the latest Island Batik collections that will start shipping to your favorite quilt shops very soon! They will also be using products from our sponsors – Aurifil, Hobbs Batting and Schmetz Needles. We hope that you will follow along to see their amazing creations!

The blog starts November 1- see each of the collections and who is posting each day below:

November 1:

Gail Sheppard, Quilting Gail 

Preeti Harris, Sew Preeti Quilts

November 2:

Pamela Boatright, Pamela Quilts

Jane Hauprich, Stitch by Stitch Custom Quilting

November 3:

Denise Looney, For the Love of Geese

Megan Best, Bestquilter

November 4:

Gail Renna, Quilt Haven Threads

Claudia Porter, Create with Claudia

November 5:

Blog Hop Round-Up Week 1 and Giveaway

November 8:

Mania Hatzioannidi, Mania for Quilts

Jennifer Fulton, Inquiring Quilter

November 9:

Joanne Hart, Unicorn Harts

Connie Kauffman, Kauffman Designs

Jennifer Eubank, Archipelago Quilting

November 10:

Jennifer Thomas, Curlicue Creations

Janet Yamamoto, Whispers of Yore

November 11:

Emily Leachman, The Darling Dogwood

Maryellen McAuliffe, Mary Mack Made Mine

November 12:

Blog Hop Round-Up Week 2 and Giveaway

November 15:

Elizabeth DeCroos, Epida Studio

Andi Stanfield, True Blue Quilts

November 16:

Brianna Roberts, Sew Cute and Quirky

Michelle Roberts, Creative Blonde

November 17:

Sally Manke, Sally Manke Fiber Artist

Leah Malasky, Quilted Delights

Suzy Webster, Websterquilt 


*****Don't forget to go to the Island Batik Blog each week and enter the drawing for some amazing fabrics!

Wednesday, October 20, 2021

More Endangered Species Quilts

The Island Batik Ambassadors have come up with some fantastic projects this month highlighting different endangered species using Aurifil threads.  Be sure and check out their projects

Megan Best – Bestquilter
Pamela Boatright – PamelaQuilts
Elizabeth DeCroos – Epida Studio
Jennifer Eubank – Archipelago Quilting
Jennifer Fulton – The Inquiring Quilter
Preeti Harris – Sew Preeti Quilts
Joanne Hart – Unicornharts
Mania Hatziioannidi – Mania for Quilts
Jane Hauprich – Stitch by Stitch Custom Quilting
Connie Kauffman – Kaufmann Designs
Emily Leachman – The Darling Dogwood
Denise Looney – For the Love of Geese
Leah Malasky – Quilted Delights
Sally Manke – Sally Manke Fiber Artist
Maryellen McAuliffe – Mary Mack Made Mine
Claudia Porter – Create with Claudia
Gail Renna – Quilt Haven Threads
Brianna Roberts – Sew Cute and Quirky
Michelle Roberts – Creative Blonde
Gail Sheppard – Quilting Gail
Jennifer Thomas – Curlicue Creations
Suzy Webster – Websterquilt
Janet Yamamoto – Whispers of Yore

Thursday, October 7, 2021

October Island Batik/Aurifil Endangered Species Challenge


                                                                          African Penguin                                                                             20" x 20"

Designed and made by Connie Kauffman

This October Island Batik Ambassador's Challenge was an interesting one.  Aurifil is one of the sponsors for the Island Batik Ambassadors and this month they headed up the challenge.  Aurifil is collaborating with Earth League International and has bundled their Color Builder thread packs to coordinate with 12 different endangered species.  Each Color Builder box contains three large 40 wt spools of thread that coordinate in color with the animal it is representing.

The twelve animals they are presenting are:  Siberian Tiger, Red Panda, Sea Turtle, Iberian Lynx, Pink Land Iquana, Whale Shark, Smatran Tiger, Blue-Throated Macaw, Wild African Dog, Cross River Gorilla, Pangolin and African Penguin.  Go to Aurifil Threads to see some lovely photos of the animals and the colors of threads in the collection.


The Color Builder box I received was for the African Penguin and contained white, gray and black spools for me to work with.


The first thing I did was look up information about the African Penguin.  Here are some of the interesting facts I found:
-African Penguins live on the Southwestern Coast of Africa
-Population now is about 50,000
-They are about 24-28" tall and weigh about 5-7 pounds and can swim 12 mph
-They spend most of their lives at sea until they come ashore to lay their eggs
-Both parents help incubate the eggs which are about 3 to 4 times bigger than hens eggs
-Average life span is 10 - 27 years in the wild, about 30 in captivity
-Zoos like to have them as they tolerate warmer temperatures and can be kept in outdoor enclosures
-Primary predators are sharks and fur seals, although many animals prey on them when nesting
-Worst thing for them are oil spills and fisheries that rob them of their food supplies (fish, squid, crustaceans)
-The pink coloring above the eye is a sweat gland that helps to cool the blood
-Sometimes called Jackass Penguin because it's call sounds like a donkey

I decided I wanted to depict a single penguin looking off into the distance to give a feeling of it being alone and what the future might hold.  I decided to make the penguin using a collage technique with fusible applique using Steam a Seam 2 onto parchment paper.  I could then remove the  penguin and place it on the background where ever I wanted.

I drew from my stash of Island Batik for some blacks, white and a variety of blues.

As an added challenge for myself, I decided to place waves on the background using glue- Elmer's glue!  Years ago I never would have tried this, but I've recently read where several people have used Elmer's glue so I thought I'd give it a try.  I used Schmetz needles and they worked great with both the fusible web and the Elmer's glue.  The glue worked great.

Here's a photo of the penguin and the start of the waves.  A lot of decisions on water color and placement.  It does get a bit messy!


I finally got the waves as I liked them.  I even added a tiny bit of lace in a couple places to try to resemble little white caps on the waves. I layered the top with the backing and Hobbs Thermore batting.  I decided to use Thermore as it is very thin and I didn't need much loft in this project.

I had most of the quilting finished and thought it was looking pretty good and then I realized something!  The penguin's right flipper was missing!


Where did it go?  I searched thru the trash....


I didn't find it so I made another one.  (After everything was finished and I cleaned up the whole sewing area, I did find it on the floor near the waste basket.)

Another challenge I made myself was to use a turned facing for the edge of the quilt.   I'd never done a faced binding before, but I wanted this quilt to look like it continued on into the distance- not to stop at the binding.

This was really super easy.  I sewed the facing to the front with triangles at the corners, turned it to the back and pressed.  The triangles in the corner can be used to put the hanging rod in.  After pressing, I ironed the facing down with Steam A Seam 2 Fusible Tape.  So easy!  I will be using this technique again I'm sure.


I did use the three colors of thread in my Color Builder Box, and I also used a couple spools of blue for quilting the water.


Here's a close up of some of the quilting and thread work.


This was a great challenge and I commend Aurifil for drawing attention to many endangered species.

Thanks to Island Batik, Aurifil, Hobbs Batting, and  Schmetz Needles for supplying product thru the Island Batik Ambassador program to make this quilt